This post contains affiliate links. As an Amazon Associate, we earn from qualifying purchases. This means we may earn a small commission if you purchase through our links, at no extra cost to you.
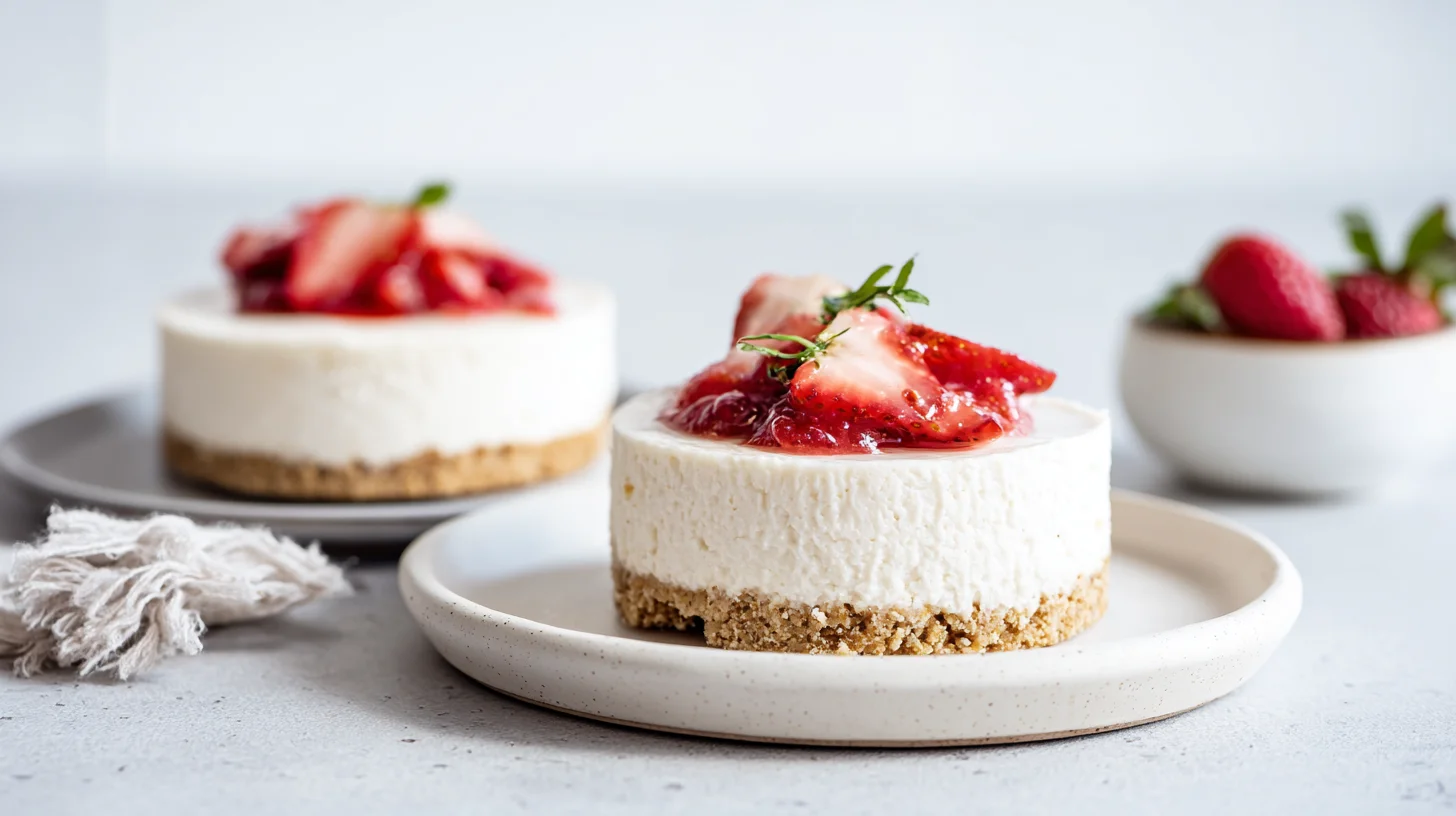
If you’ve been craving a creamy, rich cheesecake but thought you needed to spend hours in the kitchen, I have amazing news for you. This Instant Pot Keto Cheesecake delivers that silky-smooth texture and decadent flavor you love, all while keeping carbs incredibly low. Plus, your pressure cooker does most of the work for you!
I’ll never forget the first time I made cheesecake in my Instant Pot. I was skeptical, honestly. However, when I took that first bite, I was blown away by how perfectly creamy it turned out. The pressure cooking method creates an incredibly moist environment that prevents cracks and delivers bakery-quality results every single time.
Whether you’re hosting a dinner party, celebrating a special occasion, or simply treating yourself to something special, this keto-friendly dessert hits all the right notes. Best of all, it’s beginner-friendly and requires no water bath or complicated techniques. Therefore, even if you’ve never made cheesecake before, you’ll nail it on your first try.
Why You’ll Love This Recipe
- Only 4g net carbs per slice
- No water bath required
- Crack-free every time
- Perfect creamy texture
- Beginner-friendly method
Your New Favorite Pressure Cooker Dessert
Instant Pot Keto Cheesecake
8
servings20
minutes35
minutes285
kcalThis Instant Pot Keto Cheesecake delivers rich, creamy perfection with just 4g net carbs per slice. The pressure cooker method ensures a crack-free, silky-smooth texture every time without the hassle of a water bath.
Ingredients
1.5 cups almond flour
3 tablespoons butter
2 tablespoons powdered erythritol
16 ounces cream cheese
0.5 cup powdered erythritol
2 large eggs
0.25 cup sour cream
0.25 cup heavy cream
1 teaspoon vanilla extract
1 tablespoon lemon juice
1 cup water
1 pinch salt
Directions
- Prepare your springform pan by wrapping the bottom and sides tightly with two layers of heavy-duty aluminum foil to prevent water from seeping in.
- Make the crust by combining almond flour, melted butter, and 2 tablespoons erythritol in a bowl until mixture resembles wet sand.
- Press the crust mixture firmly into the bottom of your 7-inch springform pan, creating an even layer that extends slightly up the sides.
- Beat the cream cheese with an electric mixer on medium speed until smooth and fluffy, about 2 minutes, scraping down the sides as needed.
- Add the sweetener to the cream cheese and beat until fully incorporated and no lumps remain.
- Mix in the eggs one at a time, beating on low speed just until combined after each addition to avoid incorporating too much air.
Notes
- Room temperature ingredients are essential for a smooth, lump-free batter.
- Never quick-release pressure when making cheesecake as it causes cracks.
- The cheesecake will look slightly jiggly in the center when done, but will firm up as it cools.
- Store covered in the refrigerator for up to 7 days or freeze individual slices for up to 3 months.
- For best results, run a knife under hot water before slicing for clean cuts.
Nutrition Facts
- Serving Size: 1 g
- Total number of serves: 8
- Calories: 285kcal
- Fat: 24g
- Carbohydrates: 8g
- Fiber: 4g
- Protein: 6g
Like this recipe?
Follow @easyketodessert on Pinterest
Expert Tips for Perfect Instant Pot Keto Cheesecake
Making cheesecake in your pressure cooker might seem intimidating at first. However, with these helpful tips, you’ll achieve professional results every single time. Let me share the secrets I’ve learned through countless batches.
Room Temperature Ingredients Are Essential
Always bring your cream cheese and eggs to room temperature before mixing. Cold ingredients create lumps and prevent smooth blending. As a result, your cheesecake texture won’t be as silky. Set everything out about an hour before you start baking.
Don’t Skip the Foil Sling
Create a foil sling by folding a long piece of aluminum foil lengthwise into thirds. This makes lifting the hot cheesecake out of the Instant Pot so much easier. Trust me, trying to remove it without a sling is nearly impossible. Place the sling under your springform pan before adding the batter.
Wrap Your Pan Tightly
Even though you’re not using a traditional water bath, moisture can still seep into your pan. Therefore, wrap the bottom and sides of your springform pan with two layers of heavy-duty foil. This 7-inch springform pan fits perfectly in most 6-quart Instant Pots and creates beautiful individual-sized cheesecakes.
Natural Pressure Release Is Non-Negotiable
Never quick-release the pressure when making cheesecake. The sudden temperature change causes cracks and can make your cheesecake sink in the middle. Instead, let the pressure release naturally for at least 10 minutes. Then, carefully turn the valve to release any remaining pressure.
Chill Completely Before Serving
Patience is key with cheesecake. After pressure cooking, let it cool at room temperature for an hour. Then refrigerate for at least 4 hours, but preferably overnight. This allows the flavors to develop and the texture to set perfectly. Cutting into warm cheesecake results in a messy, runny disaster.
Delicious Ways to Customize Your Cheesecake
One of the best things about this recipe is how versatile it is. You can easily adapt it to match your favorite flavors or dietary needs. Here are some delicious variations I’ve tested and loved.
Chocolate Lover’s Dream
Add 1/3 cup of unsweetened cocoa powder to the batter for a rich chocolate cheesecake. You might need to increase the sweetener by 2 tablespoons since cocoa can be slightly bitter. For an extra indulgent treat, fold in some sugar-free chocolate chips before baking.
Berry Swirl Variation
Make a quick berry compote by heating 1/2 cup of fresh berries with 2 tablespoons of sweetener until thickened. Swirl it into the batter before cooking for beautiful marbled patterns. This technique works wonderfully if you enjoy fruity no-bake variations too.
Pumpkin Spice Version
Replace 1/2 cup of the cream cheese with pumpkin puree and add 1 teaspoon of pumpkin pie spice. This creates a festive fall dessert that rivals any traditional pumpkin cheesecake recipe. It’s perfect for Thanksgiving or any autumn gathering.
Lemon Zest Brightness
Add the zest of two lemons and 2 tablespoons of fresh lemon juice to the batter. This creates a bright, refreshing flavor that cuts through the richness beautifully. The citrus notes make it feel lighter and more summery.
Japanese Cotton Style
For a lighter, fluffier texture similar to Japanese cotton cheesecake, separate your eggs. Beat the whites until stiff peaks form, then gently fold them into the batter last. This creates an incredibly airy, soufflé-like texture.
Sweetener Substitutions
While I prefer erythritol for its clean taste, you can use other keto sweeteners. Monk fruit sweetener works beautifully and has zero aftertaste. Allulose creates an extra-smooth texture since it doesn’t crystallize. For more information on choosing the right sweetener, check out this helpful FDA guide. My favorite is this powdered erythritol blend that dissolves perfectly.
Understanding the Nutrition in Your Slice
Let’s talk about what makes this cheesecake such a fantastic keto option. Each generous slice contains only 4g net carbs, which fits perfectly into most low-carb meal plans. The majority of calories come from healthy fats, which keep you satisfied and help maintain ketosis.
With 24g of fat per serving, this dessert provides sustained energy without spiking blood sugar. The cream cheese base delivers 6g of protein, making it more substantial than many other desserts. According to nutrition research from Harvard, full-fat dairy can be part of a healthy diet when consumed in moderation.
The almond flour crust adds beneficial fiber and keeps the carb count low compared to traditional graham cracker crusts. At just 285 calories per slice, you can enjoy a truly decadent dessert without derailing your progress. Remember to always use fresh eggs from reliable sources, following proper food safety guidelines when handling them.
Your Cheesecake Questions Answered
Over the years, I’ve received countless questions about making cheesecake in the Instant Pot. Here are the most common concerns and everything you need to know to succeed with this recipe.
Can I use a different size pan for this Instant Pot cheesecake?
Yes, but you’ll need to adjust cooking time. A 7-inch pan is ideal for 6-quart Instant Pots. If using a 6-inch pan, reduce cooking time by 5 minutes. An 8-inch pan may not fit in standard 6-quart models.
Why did my cheesecake crack on top?
Cracks usually happen from quick pressure release or overmixing the batter. Always use natural pressure release for at least 10 minutes. Mix ingredients just until combined, and avoid incorporating too much air into the batter.
How long does Instant Pot keto cheesecake last in the fridge?
Properly stored in an airtight container, this cheesecake stays fresh for 5-7 days in the refrigerator. Cover it tightly with plastic wrap or store in a sealed container to prevent it from absorbing other flavors.
Can I freeze this keto cheesecake?
Absolutely! Wrap individual slices tightly in plastic wrap, then place in a freezer bag. Frozen cheesecake keeps for up to 3 months. Thaw overnight in the refrigerator before serving for best texture.
Do I need a trivet for making cheesecake in the Instant Pot?
Yes, you must use a trivet to elevate the pan above the water. Most Instant Pots come with a trivet. You need at least 1 cup of water in the bottom of the pot to create steam for pressure cooking.
Can I make this cheesecake without a crust?
Yes, you can skip the crust entirely for an even lower carb option. Simply grease the pan well and pour the filling directly in. This reduces the net carbs to about 3g per slice and saves prep time.
Leave a Reply