This post contains affiliate links. As an Amazon Associate, we earn from qualifying purchases. This means we may earn a small commission if you purchase through our links, at no extra cost to you.
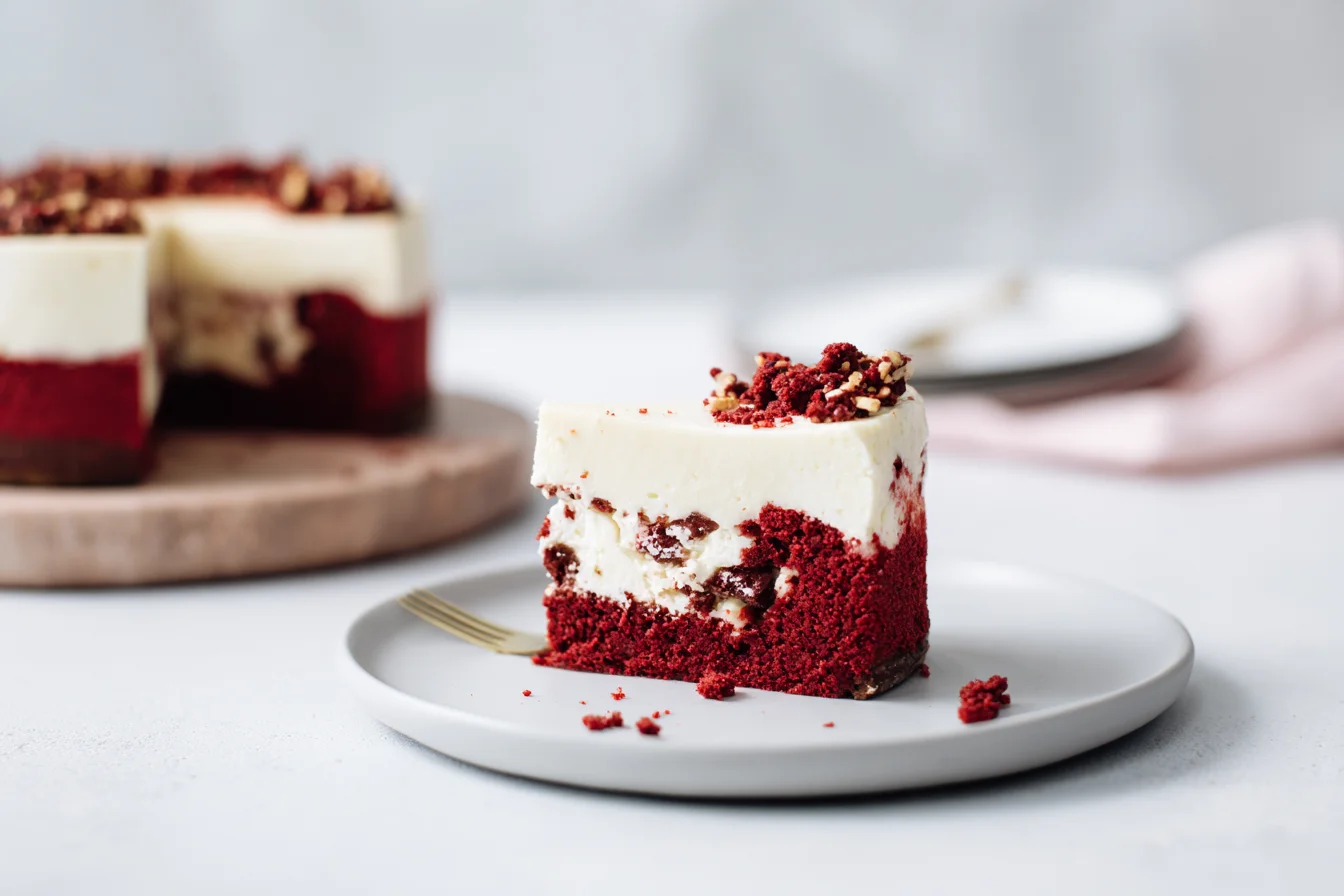
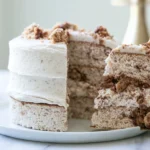
If you’re craving something show-stopping yet totally keto-friendly, this Keto Red Velvet Cheesecake is about to become your new favorite dessert. Rich, velvety, and absolutely stunning, this layered beauty combines the tangy sweetness of red velvet cake with a creamy cheesecake filling that melts in your mouth. It’s the perfect dessert for Valentine’s Day, birthdays, or any time you want to impress your guests without kicking yourself out of ketosis.
I first made this cheesecake for my husband’s birthday last year, and honestly, no one could believe it was sugar-free. The deep red color, the smooth cream cheese layer, and that subtle cocoa flavor all come together in a way that feels indulgent and special. Plus, it’s easier to make than you might think, even if you’re not a baking expert.
Whether you’re hosting a dinner party or simply treating yourself to something spectacular, this dessert delivers on every level. Therefore, let’s dive into what makes this keto cheesecake so irresistible and how you can make it at home with confidence.
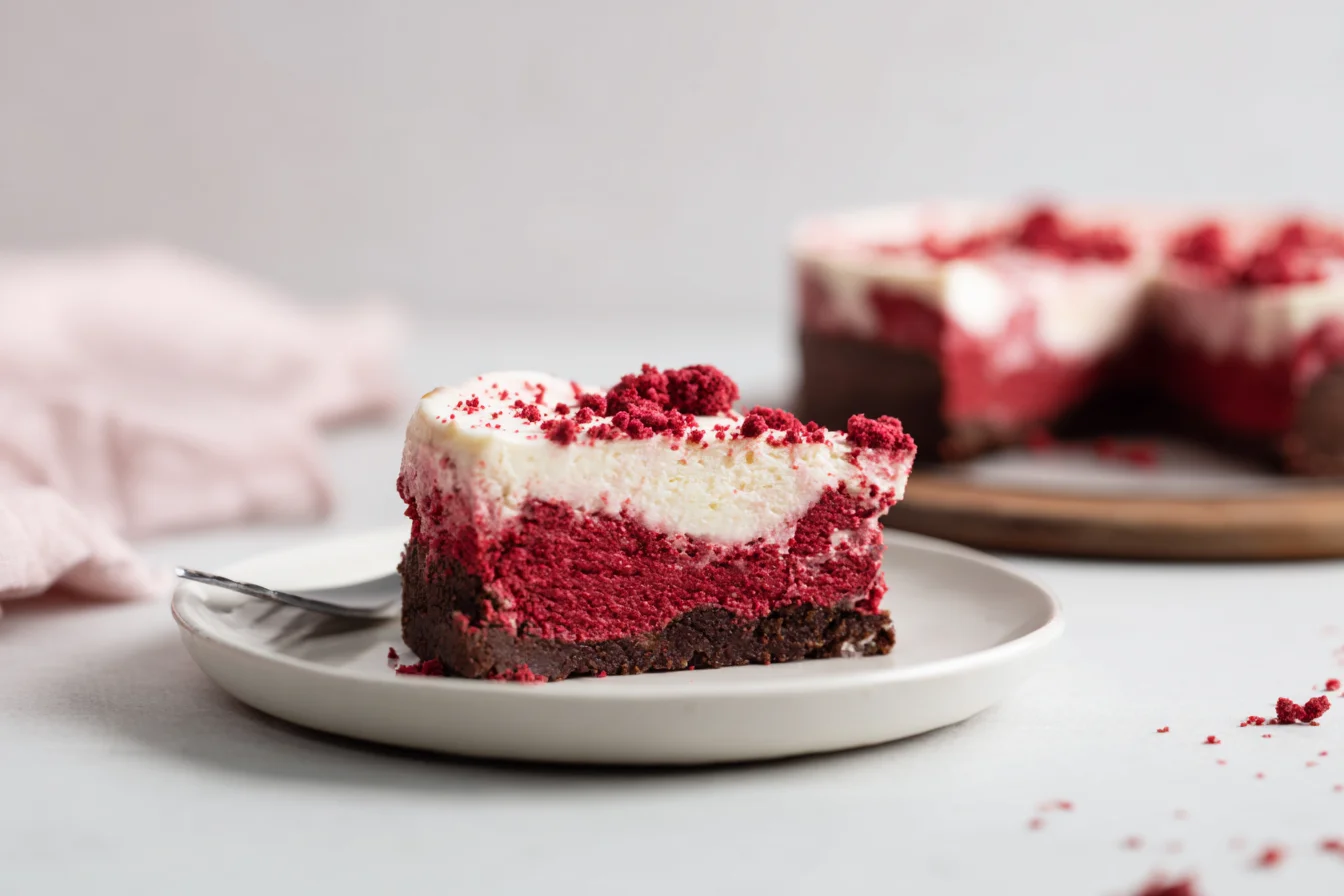
Table of Contents
Why You’ll Love This Recipe
- Only 4g net carbs per slice
- Stunning red velvet color perfect for special occasions
- Rich cream cheese filling with a hint of cocoa
- No-bake crust option available
- Feeds 12 people generously
Your Step-by-Step Guide to Red Velvet Perfection
Keto Red Velvet Cheesecake
12
servings30
minutes1
hour320
kcalThis stunning Keto Red Velvet Cheesecake features a rich almond flour crust, a vibrant red velvet cake layer with hints of cocoa, and a smooth cream cheese filling. It’s the perfect low-carb dessert for celebrations with only 4g net carbs per slice.
Ingredients
2 cups almond flour
0.25 cup butter
0.25 cup powdered erythritol
24 oz cream cheese
0.75 cup powdered erythritol
3 large eggs
1 cup sour cream
2 tablespoons cocoa powder
1 teaspoon vanilla extract
1 teaspoon red gel food coloring
0.5 cup heavy cream
2 tablespoons powdered erythritol
Directions
- Preheat your oven to 325°F and wrap the outside of a 9-inch springform pan with aluminum foil to prevent water from seeping in during the water bath.
- Combine almond flour, melted butter, and 1/4 cup powdered erythritol in a bowl and mix until it resembles wet sand, then press firmly into the bottom of the prepared pan.
- Bake the crust for 10 minutes until lightly golden, then remove from oven and let cool while you prepare the filling.
- Beat the softened cream cheese with 3/4 cup powdered erythritol in a large bowl using an electric mixer on medium speed until smooth and fluffy, about 3 minutes.
- Add eggs one at a time, beating well after each addition and scraping down the sides of the bowl to ensure everything is well incorporated.
- Mix in the sour cream, cocoa powder, vanilla extract, and red gel food coloring until the batter is smooth and evenly colored throughout.
Notes
- Make sure all dairy ingredients are at room temperature before mixing to prevent lumps in your cheesecake filling.
- The cheesecake will continue to firm up as it chills, so don’t worry if it seems slightly soft when you first remove it from the oven.
- For the most vibrant red color, use gel food coloring rather than liquid, as it won’t thin out your batter.
- Store covered in the refrigerator for up to 5 days, or freeze individual slices for up to 2 months.
Nutrition Facts
- Serving Size: 1 g
- Total number of serves: 12
- Calories: 320kcal
- Fat: 29g
- Carbohydrates: 6g
- Fiber: 2g
- Protein: 7g
Like this recipe?
Follow @easyketodessert on Pinterest
Expert Tips for the Best Keto Red Velvet Cheesecake
Making a layered cheesecake might seem intimidating at first, but with these tips, you’ll nail it every time. In addition, these tricks will help you avoid common pitfalls and ensure your dessert looks as gorgeous as it tastes. Let me walk you through everything I’ve learned from making this recipe dozens of times.
Getting the Perfect Red Color
The key to that stunning red velvet hue is using gel food coloring instead of liquid. Gel colors are more concentrated, so you need less to achieve a vibrant shade. Start with one teaspoon and add more gradually until you reach your desired intensity. However, be careful not to add too much, as it can affect the texture slightly.
Avoiding Cracks in Your Cheesecake
Nobody wants a cracked cheesecake top, right? The secret is baking at a lower temperature and using a water bath. Wrap your springform pan in aluminum foil and place it in a larger pan filled with hot water. This creates steam and prevents the top from drying out and cracking. As a result, you’ll get a smooth, professional-looking finish every time.
Choosing the Right Sweetener
Not all keto sweeteners work the same in cheesecakes. I recommend using powdered erythritol sweetener for the smoothest texture without any grittiness. Powdered sweeteners dissolve better in the cream cheese mixture than granulated versions. For more information on sweetener choices, check out this FDA guide on sweeteners to understand your options better.
Bringing Ingredients to Room Temperature
This step is crucial and cannot be skipped. Cold cream cheese creates lumps that are nearly impossible to smooth out. Take your cream cheese and eggs out of the fridge at least an hour before baking. Room temperature ingredients blend together seamlessly, creating that silky cheesecake texture we all love.
Cooling and Chilling Properly
Patience is essential when making cheesecake. After baking, turn off the oven and crack the door open, letting the cheesecake cool gradually for about an hour. Then refrigerate for at least 6 hours, or preferably overnight. This prevents temperature shock and ensures the filling sets perfectly. Trust me, it’s worth the wait.
Creative Variations to Try
One of the best things about this recipe is how adaptable it is. You can customize it based on your preferences or dietary needs without sacrificing flavor. Therefore, I’ve included some of my favorite variations that work beautifully with this base recipe.
Chocolate Lover’s Version
Want to amp up the chocolate factor? Add an extra tablespoon of cocoa powder to the cake layer and fold in some sugar-free chocolate chips. You can also drizzle melted sugar-free chocolate on top for an extra decadent finish. If you love chocolate cheesecakes, you might also enjoy this rich keto chocolate cheesecake that’s equally impressive.
No-Bake Crust Option
If you want to skip the oven for the crust, simply mix almond flour with melted butter and press it into the pan. Refrigerate for 30 minutes to set, then proceed with the filling. This works wonderfully and saves time. For more no-bake inspiration, check out this easy no-bake keto cheesecake that requires zero baking at all.
Swirled Brownie Cheesecake
For an extra special twist, swirl in some keto brownie batter before baking. Simply prepare a small batch of brownie batter, dollop it on top of the cheesecake filling, and swirl with a knife. The result is a gorgeous marbled effect that tastes incredible. You can find inspiration from this keto cheesecake brownie recipe for the perfect batter consistency.
Dairy-Free Adaptation
You can make this recipe dairy-free by using coconut cream instead of heavy cream and dairy-free cream cheese alternatives. The texture will be slightly different but still delicious. Make sure to use full-fat coconut cream for the richest results. Additionally, choose a dairy-free cream cheese that’s specifically designed for baking to ensure it sets properly.
Mini Cheesecake Portions
Turn this into individual servings by using a muffin tin lined with cupcake liners. Divide the crust and filling among 12 cups and reduce the baking time to about 20-25 minutes. These mini cheesecakes are perfect for portion control and look adorable at parties. Plus, they’re easier to serve and store.
Understanding the Nutrition in Your Slice
Let’s talk numbers, because knowing what you’re eating helps you stay on track with your keto goals. Each generous slice of this Keto Red Velvet Cheesecake contains approximately 320 calories, which is reasonable for such a rich and satisfying dessert. The fat content sits at around 29 grams per serving, which is exactly what you want on a ketogenic diet since fat is your primary fuel source.
The protein content comes in at about 7 grams per slice, mainly from the cream cheese and eggs. This helps keep you satisfied and supports muscle maintenance. Most importantly, the net carbs are only 4 grams per serving, making this dessert perfectly keto-friendly. The total carbs are 6 grams, with 2 grams of fiber bringing down the net count.
The cream cheese in this recipe provides beneficial nutrients beyond just macros. According to Harvard’s nutrition source on cheese, cheese products can be a good source of calcium and protein when consumed in moderation. However, the real magic here is how we’ve transformed traditional red velvet cheesecake into a low-carb masterpiece without sacrificing taste or texture.
When preparing this dessert, using quality ingredients makes a difference in both nutrition and flavor. I recommend investing in high-quality almond flour for the crust, as it provides healthy fats and a better texture than cheaper alternatives. Additionally, always use fresh eggs and check proper egg safety guidelines to ensure your dessert is both delicious and safe.
For the best results, I also suggest using gel food coloring specifically designed for baking to achieve that vibrant red color without adding extra liquid to your batter. This small detail makes a big difference in both appearance and texture. Remember, presentation matters when you’re serving something this special.
Your Questions Answered
I receive so many questions about making keto cheesecakes, and I love helping you troubleshoot. Below, I’ve answered the most common questions about this Keto Red Velvet Cheesecake to help you achieve perfect results every single time. If you have additional questions, feel free to leave a comment and I’ll get back to you as soon as possible.
Can I make this Keto Red Velvet Cheesecake ahead of time?
Absolutely! In fact, this cheesecake tastes even better when made a day ahead. The flavors have time to meld together and the texture becomes even creamier. You can make it up to 3 days in advance and store it covered in the refrigerator. Just add any toppings right before serving to keep them fresh and beautiful.
How do I store leftover keto cheesecake?
Store leftover slices in an airtight container in the refrigerator for up to 5 days. You can also freeze individual slices wrapped tightly in plastic wrap and then in foil for up to 2 months. Thaw overnight in the refrigerator before serving. The texture holds up remarkably well after freezing.
Why is my cheesecake cracking on top?
Cracks usually happen from rapid temperature changes or overbaking. To prevent this, use a water bath during baking, avoid opening the oven door while baking, and let the cheesecake cool gradually in the turned-off oven with the door cracked. Also, don’t overmix the batter as this incorporates too much air which can cause cracks.
Can I use liquid food coloring instead of gel?
You can, but you’ll need much more liquid coloring to achieve the same vibrant red, which can thin out your batter and affect the texture. Gel food coloring is more concentrated and doesn’t add extra liquid to your mixture. If you only have liquid coloring, use it sparingly and expect a lighter pink color rather than deep red.
What can I use instead of almond flour for the crust?
You can substitute coconut flour, but use only one-third the amount since coconut flour is much more absorbent. Another option is crushed pork rinds mixed with melted butter for a completely nut-free crust. You can also use a combination of sunflower seed flour and coconut flour for a different flavor profile that’s still keto-friendly.
How do I know when my cheesecake is done baking?
The cheesecake is done when the edges are set but the center still has a slight jiggle, about the size of a quarter. It should not look liquid but shouldn’t be completely firm either. The internal temperature should reach 150°F in the center. Remember, it will continue to set as it cools, so slightly underbaking is better than overbaking.


Leave a Reply