This post contains affiliate links. As an Amazon Associate, we earn from qualifying purchases. This means we may earn a small commission if you purchase through our links, at no extra cost to you.
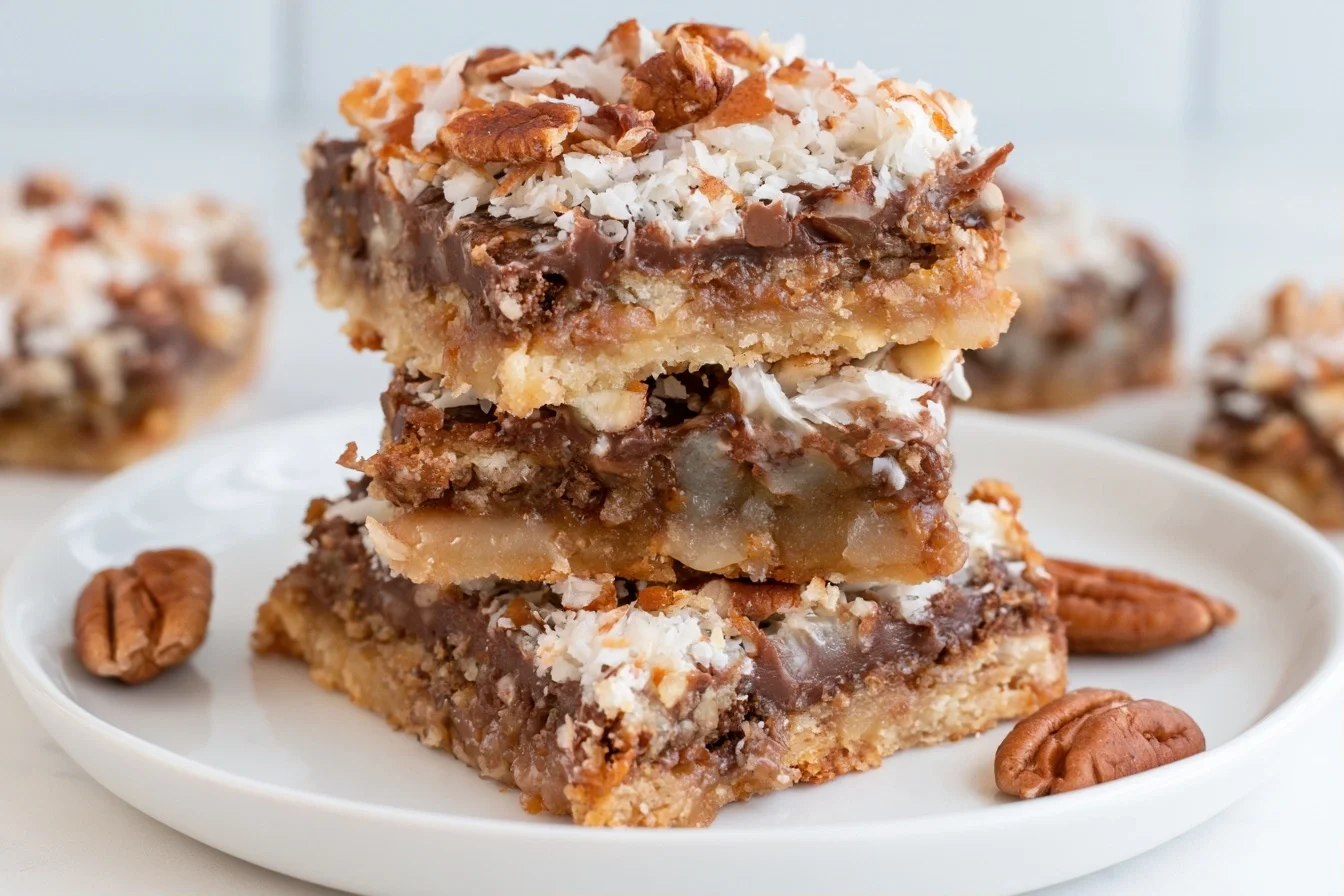
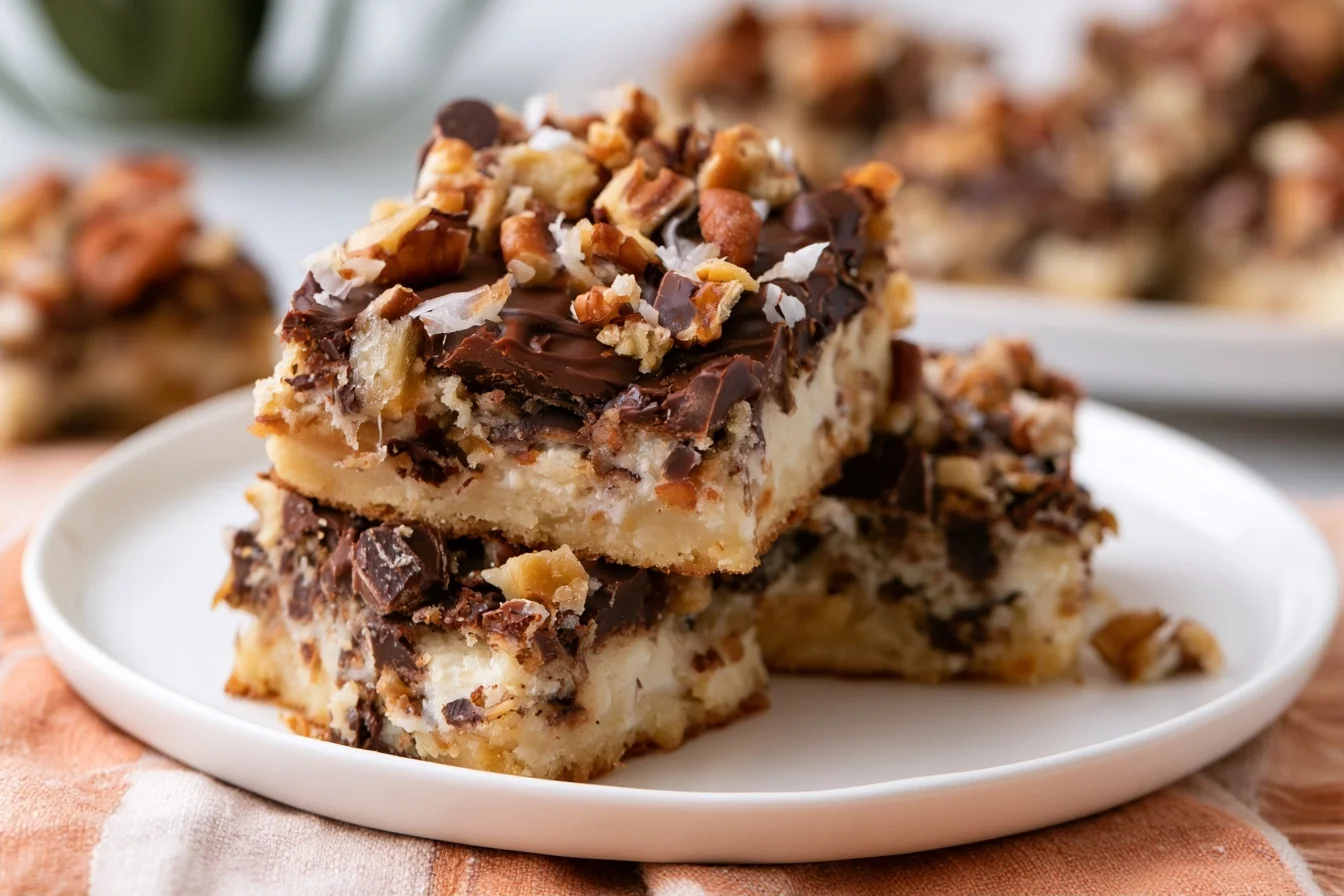
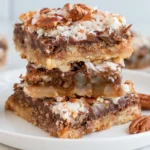
If you’ve been craving a nostalgic treat that fits your low-carb lifestyle, these keto seven layer bars are about to become your new obsession. These decadent bars pack all the classic flavors you remember from childhood—buttery crust, rich chocolate, toasted coconut, and crunchy pecans—without the sugar crash. Therefore, you can enjoy every gooey, indulgent bite guilt-free.
I first made these for a family gathering last summer, and honestly, no one could tell they were sugar-free. My aunt even asked for the recipe twice! In addition, they’re incredibly simple to throw together. You just layer everything in a pan, bake, and let them cool. No complicated techniques or fancy equipment required.
These bars are perfect for potlucks, holiday cookie exchanges, or just keeping in your fridge for when that sweet tooth strikes. As a result, you’ll always have a satisfying dessert ready to go. Plus, they slice beautifully and look absolutely stunning on a dessert platter.
Why You’ll Love This Recipe
- Only 3g net carbs per bar
- Ready in under 45 minutes
- No mixer needed—just layer and bake
- Tastes exactly like the classic version
- Stores well for up to 2 weeks
Your New Favorite Layered Bar Recipe
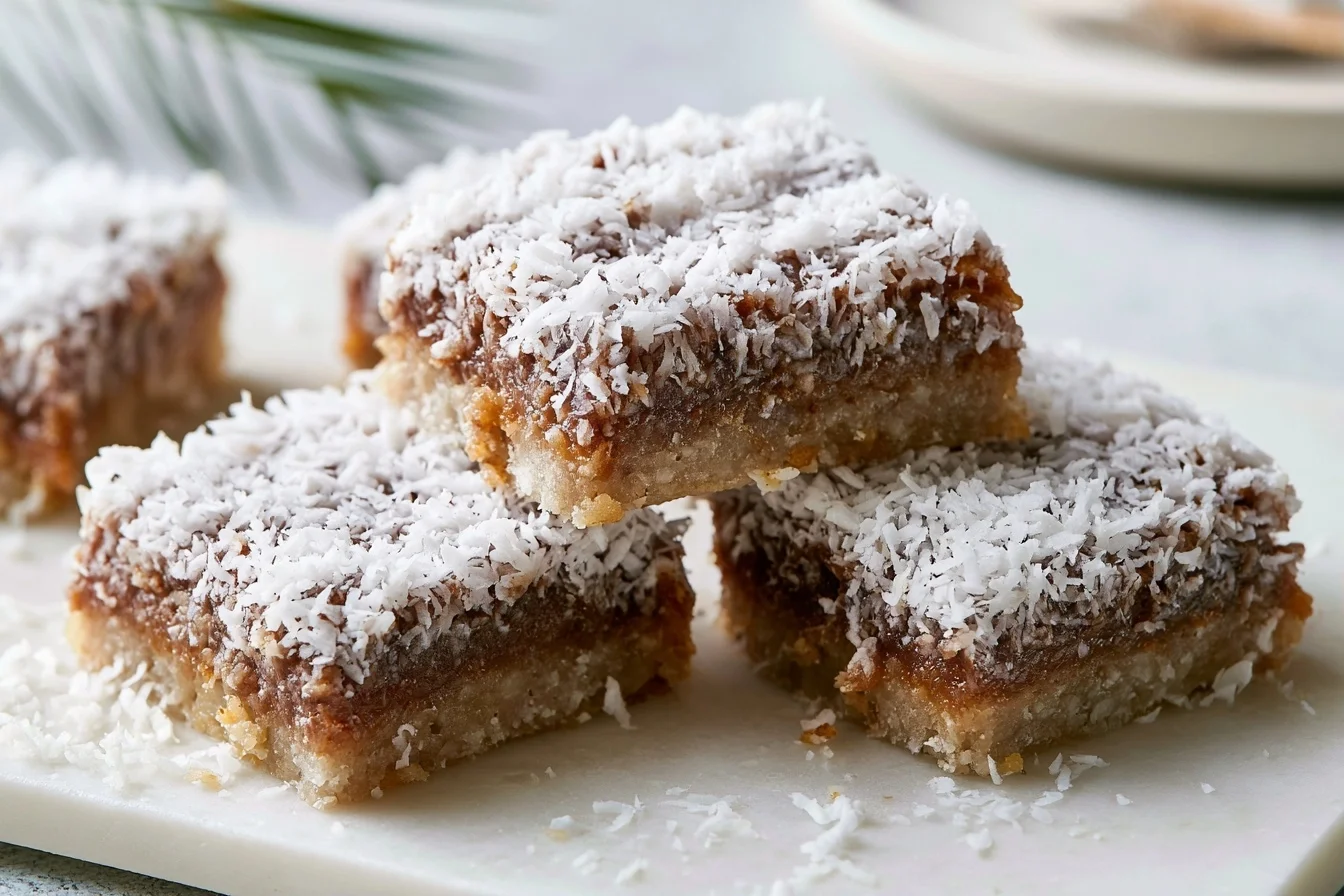
Keto Seven Layer Bars
16
servings15
minutes25
minutes245
kcalThese keto seven layer bars deliver all the nostalgic flavors of the classic dessert with a buttery almond flour crust, rich chocolate chips, toasted coconut, and crunchy pecans. Each bar has only 3g net carbs, making them the perfect low-carb treat for any occasion.
Ingredients
2 cups almond flour
6 tablespoons butter
1/4 cup powdered erythritol
1 cup sugar-free chocolate chips
1 cup unsweetened shredded coconut
1 cup pecans
1 cup heavy cream
1/2 cup powdered erythritol
1 teaspoon vanilla extract
1/4 teaspoon salt
2 tablespoons cream cheese
1/4 teaspoon xanthan gum
Directions
- Preheat your oven to 350°F and line a 9×9 inch baking pan with parchment paper, leaving overhang on the sides for easy removal.
- Mix the almond flour, melted butter, 1/4 cup powdered erythritol, and salt in a medium bowl until it resembles wet sand.
- Press the crust mixture firmly and evenly into the bottom of the prepared pan using the bottom of a measuring cup.
- Bake the crust for 8 minutes until it just starts to turn golden around the edges, then remove from oven.
- Make the keto condensed milk by heating heavy cream, 1/2 cup powdered erythritol, cream cheese, and xanthan gum in a saucepan over medium heat, stirring constantly until it thickens slightly, about 5 minutes.
- Remove from heat and stir in the vanilla extract, then let it cool for 2 minutes.
Notes
- Toast the coconut and pecans separately in a 350°F oven for 5-7 minutes before using to enhance their flavor.
- The bars will be quite soft when warm but firm up beautifully after refrigeration.
- Store in an airtight container in the refrigerator for up to 2 weeks or freeze for up to 3 months.
- For cleaner cuts, wipe your knife between each slice and use a gentle sawing motion.
- If you don’t have xanthan gum, the condensed milk will still work but may be slightly thinner.
Nutrition Facts
- Serving Size: 1 g
- Total number of serves: 16
- Calories: 245kcal
- Fat: 23g
- Carbohydrates: 6g
- Fiber: 3g
- Protein: 5g
Like this recipe?
Follow @easyketodessert on Pinterest
Expert Tips for Perfect Keto Seven Layer Bars
Making these bars is straightforward, but a few simple tricks will ensure they turn out perfectly every time. First, let’s talk about getting that ideal texture and flavor balance. Then, I’ll share some storage secrets that keep them fresh for days.
Getting the Crust Just Right
Press your almond flour crust firmly into the pan before baking. This creates a solid foundation that won’t crumble when you slice the bars. Use the bottom of a measuring cup to pack it down evenly. In addition, pre-baking the crust for 8 minutes helps it hold together better once you add the toppings.
Choosing Your Chocolate
Sugar-free chocolate chips can vary widely in quality. I recommend using these lily’s dark chocolate chips because they melt beautifully and don’t have that artificial aftertaste. However, any stevia-sweetened or monk fruit-sweetened chocolate works well. Just avoid maltitol-based chips as they can cause digestive issues.
Toast Your Coconut and Nuts
Toasting the shredded coconut and pecans before adding them intensifies their flavor dramatically. Simply spread them on a baking sheet and toast at 350°F for 5-7 minutes until golden. Watch them carefully as they can burn quickly. This extra step makes a huge difference in the final taste.
Let Them Cool Completely
I know it’s tempting to dig in right away, but patience pays off here. Let the bars cool at room temperature for 30 minutes, then refrigerate for at least 2 hours. This allows everything to set properly so you get clean, beautiful slices. Otherwise, they’ll be too gooey to cut neatly.
Storage and Freezing
Store these bars in an airtight container in the refrigerator for up to 2 weeks. They actually taste better after a day or two as the flavors meld together. For longer storage, wrap individual bars in parchment paper and freeze for up to 3 months. They thaw quickly at room temperature.
Delicious Variations to Try
Once you master the basic recipe, you can customize these bars in countless ways. Therefore, you’ll never get bored with the same flavors. Here are my favorite variations that keep things interesting while staying completely keto-friendly.
Chocolate Lover’s Version
Double the chocolate by adding a layer of sugar-free chocolate ganache on top. Simply heat heavy cream and pour it over chopped sugar-free chocolate, then spread over the cooled bars. This creates an extra decadent finish that chocolate fanatics will adore. For more chocolate inspiration, check out these keto magic cookies that use similar techniques.
Tropical Paradise Bars
Swap the pecans for macadamia nuts and add some sugar-free dried pineapple pieces. Use extra coconut for that island vibe. In addition, a dash of rum extract in the sweetened condensed milk mixture adds an authentic tropical flavor. These remind me of vacation every single time.
Dairy-Free Alternative
Replace the butter with coconut oil and use full-fat coconut cream instead of sweetened condensed milk. Mix the coconut cream with powdered monk fruit sweetener until smooth. The coconut flavor becomes more prominent, which pairs beautifully with the other ingredients. If you love coconut desserts, you’ll also enjoy these coconut cookies.
Nutty Delight
Mix different nuts for varied texture and flavor. Try a combination of pecans, walnuts, and sliced almonds. Each nut brings its own character to the bars. However, make sure to chop larger nuts into smaller pieces so they distribute evenly throughout each slice.
Lemon Coconut Twist
Add the zest of two lemons to your crust and a teaspoon of lemon extract to the condensed milk mixture. This creates a bright, refreshing flavor that cuts through the richness. The citrus notes complement the coconut perfectly. For more citrus dessert ideas, these lemon bars are absolutely divine.
Understanding the Nutrition
Each bar contains approximately 245 calories, which makes them a satisfying treat without derailing your macros. The fat content sits at around 23g per serving, primarily from healthy sources like nuts, coconut, and butter. This high fat content is exactly what you want on a ketogenic eating plan.
Protein comes in at 5g per bar, which isn’t huge but contributes to your daily intake. The real magic happens with the carbs—only 6g total carbs with 3g of fiber. Therefore, you’re looking at just 3g net carbs per bar. This makes them perfect for staying in ketosis while satisfying your sweet cravings.
The sugar content remains at 1g, coming naturally from the nuts and coconut. We use sugar substitutes throughout the recipe to keep it truly low-carb. However, you still get all that classic sweetness you remember. The sweeteners we use don’t spike blood sugar, making these bars suitable for diabetics too.
One important note about portions—these bars are rich and satisfying. Most people find one bar completely fulfills their dessert craving. In addition, the high fat content keeps you feeling full longer. You won’t experience that sugar crash or immediate hunger that comes with traditional seven layer bars.
Your Keto Baking Questions Answered
Over the years, I’ve received tons of questions about making these bars. Therefore, I’ve compiled the most common ones here to help you achieve perfect results every time. These answers cover everything from ingredient substitutions to troubleshooting common issues.
Can I use coconut flour instead of almond flour for the crust?
Coconut flour absorbs much more liquid than almond flour, so it’s not a direct substitute. If you must use coconut flour, use only 1/3 cup and add an extra egg to bind everything together. However, the texture will be different from the original recipe.
What can I use instead of sweetened condensed milk?
Make your own keto condensed milk by simmering 1 cup heavy cream with 1/2 cup powdered erythritol until it reduces by half and thickens. This takes about 15-20 minutes. Let it cool slightly before pouring over your bars.
Why are my bars falling apart when I cut them?
This usually happens when the bars haven’t cooled completely. Make sure to refrigerate them for at least 2 hours before slicing. Also, ensure you pressed the crust firmly into the pan and pre-baked it. Using a sharp knife wiped clean between cuts also helps.
Can I make these nut-free?
Yes, replace the almond flour crust with sunflower seed flour and omit the pecans. You can add extra coconut or sugar-free chocolate chips instead. Sunflower seed flour may turn the crust slightly green due to a reaction with baking soda, but it’s completely safe to eat.
How do I prevent the chocolate chips from sinking to the bottom?
Toss the chocolate chips in a tablespoon of almond flour before sprinkling them over the crust. This light coating helps them stay suspended in the layers. Also, make sure your crust is completely cooled before adding toppings.
What’s the best way to cut clean slices?
Use a large sharp knife and run it under hot water, then dry it completely. Make one cut, wipe the knife clean, heat it again, and repeat. This method gives you beautiful, bakery-style slices every time.
Leave a Reply